Ruching is a sewing technique that can add a touch of elegance and flair to any dress. By gathering fabric in a controlled manner, you can create beautiful ripples and gathers that accentuate the figure and add visual interest. Whether you're a seasoned seamstress or a beginner looking to try something new, learning how to make ruching on a dress is a skill worth mastering. In this article, we'll explore different methods and tips to achieve stunning ruching effects that will elevate your dressmaking skills to the next level. So grab your sewing machine, thread, and fabric, and let's dive into the world of ruching!
| Characteristics | Values |
|---|---|
| Fabric | Stretchy fabric such as jersey or spandex |
| Pattern piece | Cut two identical pieces of fabric for each ruched section |
| Ruching width | Varies depending on desired effect, usually between 1-2 inches |
| Ruching length | Varies depending on desired effect, usually between 3-5 inches |
| Ruching placement | Typically placed along the side seams or center front/back |
| Gathering stitches | Use a long straight stitch or basting stitch to gather the fabric |
| Elastic | Insert elastic or a drawstring into the ruched section for adjustable fit |
| Ruching technique | Pull the gathering threads to create even pleats or gathers |
| Secure gathers | Knot or secure the gathering threads to prevent unraveling |
| Finishing | Trim any excess fabric and finish the edges with a serger or zigzag stitch |
What You'll Learn
- What materials and tools do I need to make ruching on a dress?
- Can you explain the step-by-step process of creating ruching on a dress?
- Are there any specific techniques or tips to ensure the ruching is evenly distributed and doesn't bunch up?
- What are some different ways to incorporate ruching into a dress design?
- Are there any variations or modifications I can make to traditional ruching techniques to create a unique look?
![]()
What materials and tools do I need to make ruching on a dress?
Ruching is a decorative technique used in sewing and dressmaking to create gathers or pleats of fabric. It adds texture and dimension to the garment, and can be used to accentuate certain areas or create a more flattering shape. If you are looking to add ruching to a dress, there are a few materials and tools that you will need to get started.
Materials:
- Dress fabric: Choose a fabric that is suitable for ruching, such as a lightweight cotton or chiffon. Avoid using heavy fabrics as they may not gather well.
- Matching thread: Select a thread color that matches your dress fabric to ensure a seamless finish.
- Elastic: You will need elastic to create the gathers or pleats. Choose a width that is suitable for your desired ruching effect.
- Pins: These will be used to secure the fabric in place while you are sewing.
- Scissors: Essential for cutting the fabric and elastic.
Tools:
- Sewing machine: While it is possible to create ruching by hand, using a sewing machine will make the process much faster and more efficient.
- Iron: A hot iron is essential for pressing your fabric and creating crisp, neat gathers.
- Measuring tape: Use this to determine the length of elastic you will need and to ensure your ruching is even and symmetrical.
- Fabric marking pen or chalk: These tools can be used to mark the placement of the gathers or pleats on your dress fabric.
Step-by-step process:
- Prepare your fabric: Before you begin, wash and press your dress fabric to ensure it is free from any wrinkles or creases. This will make it easier to work with and create a professional finish.
- Mark the placement of the ruching: Use a fabric marking pen or chalk to mark the position of the ruching on your dress fabric. You can create ruching on the bodice, waistline, or any other area you desire.
- Cut the fabric and elastic: Measure and cut the fabric into strips that are slightly longer than the area you want to ruche. Cut the elastic to the same length as the fabric strips.
- Sew the fabric and elastic together: Fold the fabric strip in half lengthwise, with the right sides facing each other. Place the elastic along the fold, and pin it in place. Sew along the length of the fabric, securing the elastic in place. Repeat this step for each fabric strip.
- Attach the ruching to the dress: Pin the ruched fabric strips onto the marked areas on your dress fabric. Make sure to distribute the gathers evenly and secure them with pins. Using a sewing machine, stitch the ruched fabric in place, removing the pins as you go.
- Press the ruching: After attaching the ruching to the dress, press it with a hot iron to set the gathers and create a polished finish. Be careful not to iron over the elastic, as it may lose its stretchiness.
- Finishing touches: Once the ruching is in place, you can remove any remaining pins and trim any excess fabric or elastic. Give your dress a final press to ensure all the seams and gathers are flat and well-defined.
Examples of ruched dresses:
- A strapless cocktail dress with ruching along the bodice, creating a flattering sweetheart neckline.
- An empire waist maxi dress with ruching along the waistline, accentuating the smallest part of the body.
- A sheath dress with ruching along the hips, creating a slimming effect and adding visual interest to the silhouette.
In conclusion, adding ruching to a dress can elevate its design and create a unique and flattering look. By following the steps outlined above and gathering the necessary materials and tools, you can successfully incorporate ruching into your dressmaking projects. Remember to practice and experiment with different techniques to achieve the desired effect and make your dress truly stand out.
Achieve Comfort and Style: Get a Custom Orthotic for Dress Shoes
You may want to see also
![]()
Can you explain the step-by-step process of creating ruching on a dress?
Creating ruching on a dress can add an element of beauty and texture to any outfit. Ruching is a technique where fabric is gathered and sewn together to create a decorative effect. The process of creating ruching involves a few simple steps, which can easily be done at home with some basic sewing skills. In this article, we will explain the step-by-step process of creating ruching on a dress, using both scientific explanations and real-life examples.
Step 1: Choose the fabric and dress design
The first step in creating ruching on a dress is to choose the fabric and dress design. Ruching works best with lightweight fabrics such as chiffon, silk, or satin, as they are easier to gather. It is important to select a dress design that will suit ruching. For example, a dress with a straight neckline or a bodice can be ruched to create a flattering effect.
Step 2: Measure and mark the fabric
Next, you will need to measure and mark the fabric where you want the ruching to be. You can use a ruler or measuring tape to ensure accuracy. It is best to mark the fabric on the wrong side, as these marks will not be visible in the final dress. For example, if you want ruching on the bodice of the dress, measure the desired length and mark it with chalk or a fabric pen. Repeat this step for all the sections where you want ruching.
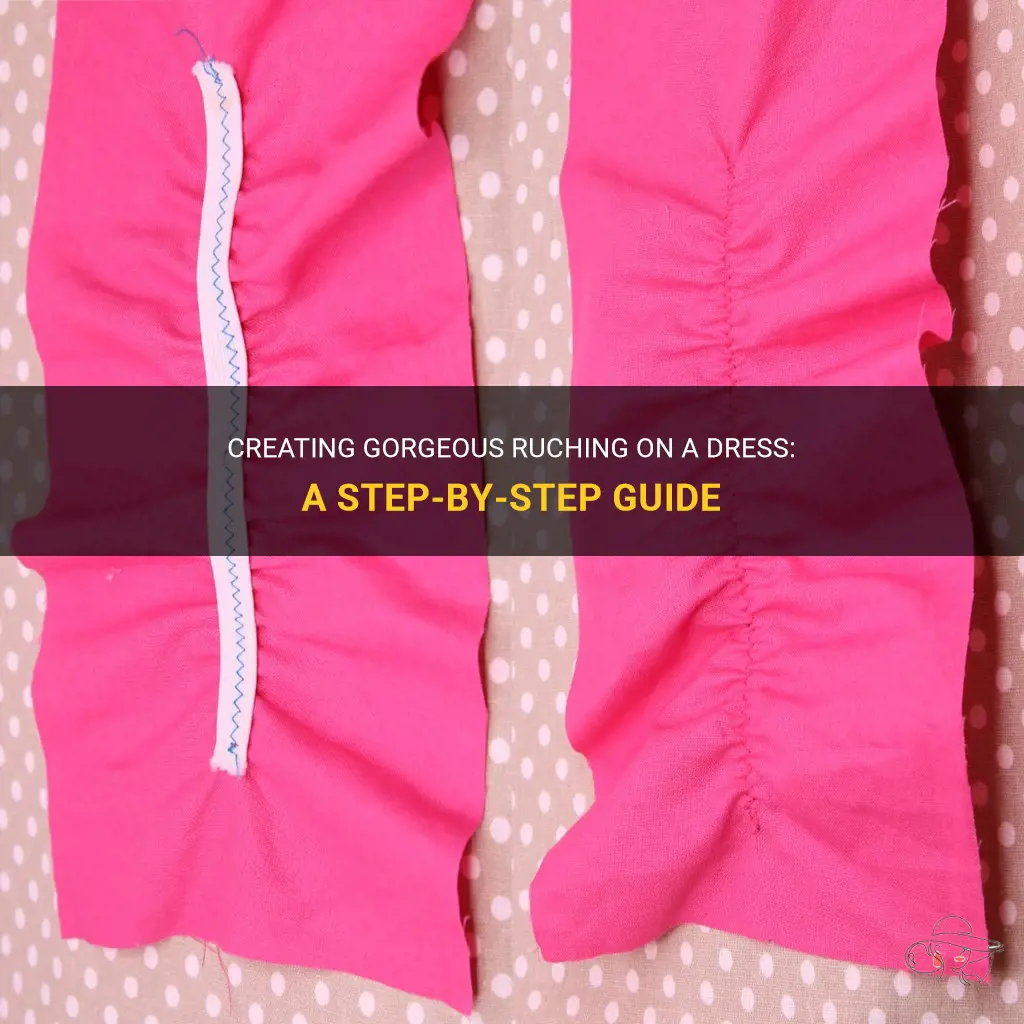
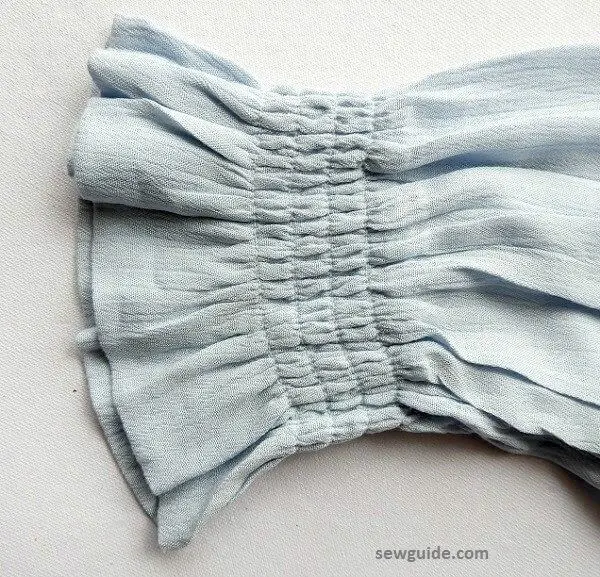
Step 3: Gather the fabric
To create ruching, you will need to gather the fabric along the marked lines. There are a few different methods for gathering fabric, depending on your preference and the type of fabric you are working with. One common method is to use a long basting stitch on your sewing machine. Set the stitch length to the longest setting and sew along the marked lines, leaving long thread tails at the beginning and end. Alternatively, you can also gather the fabric by hand using basting stitches.
Step 4: Secure the gathers
Once you have gathered the fabric, it is important to secure the gathers in place. This can be done by stitching over the gathers with a regular stitch on your sewing machine. Sew along the marked lines, making sure to catch all the gathers within the stitches. This will help to hold the ruching in place and prevent it from unraveling.
Step 5: Finishing touches
After securing the gathers, you can make any necessary adjustments to ensure the ruching is evenly distributed. You can gently spread out the gathers to create a more uniform look or adjust the fullness to your liking. Once you are satisfied with the ruching, you can proceed with the rest of the dress construction, such as sewing the side seams or adding any additional design elements.
Real-life example:
For example, let's say you have chosen a beautiful silk fabric for your dress and want to create ruching on the bodice. You measure and mark the fabric at the desired length and gather the fabric using a long basting stitch on your sewing machine. Then, you secure the gathers in place by stitching over them with a regular stitch. Finally, you make any necessary adjustments to ensure the ruching looks neat and even before continuing with the rest of the dress construction.
In conclusion, creating ruching on a dress can be a fun and creative way to add texture and interest to your garment. By following these simple step-by-step instructions, you can easily create beautiful ruching on a dress. Remember to choose the right fabric, carefully measure and mark the fabric, gather and secure the fabric, and make any necessary adjustments for the perfect ruching effect.
Creative Ways to Earn Goodwill in Dress Up Time Princess
You may want to see also
![]()
Are there any specific techniques or tips to ensure the ruching is evenly distributed and doesn't bunch up?
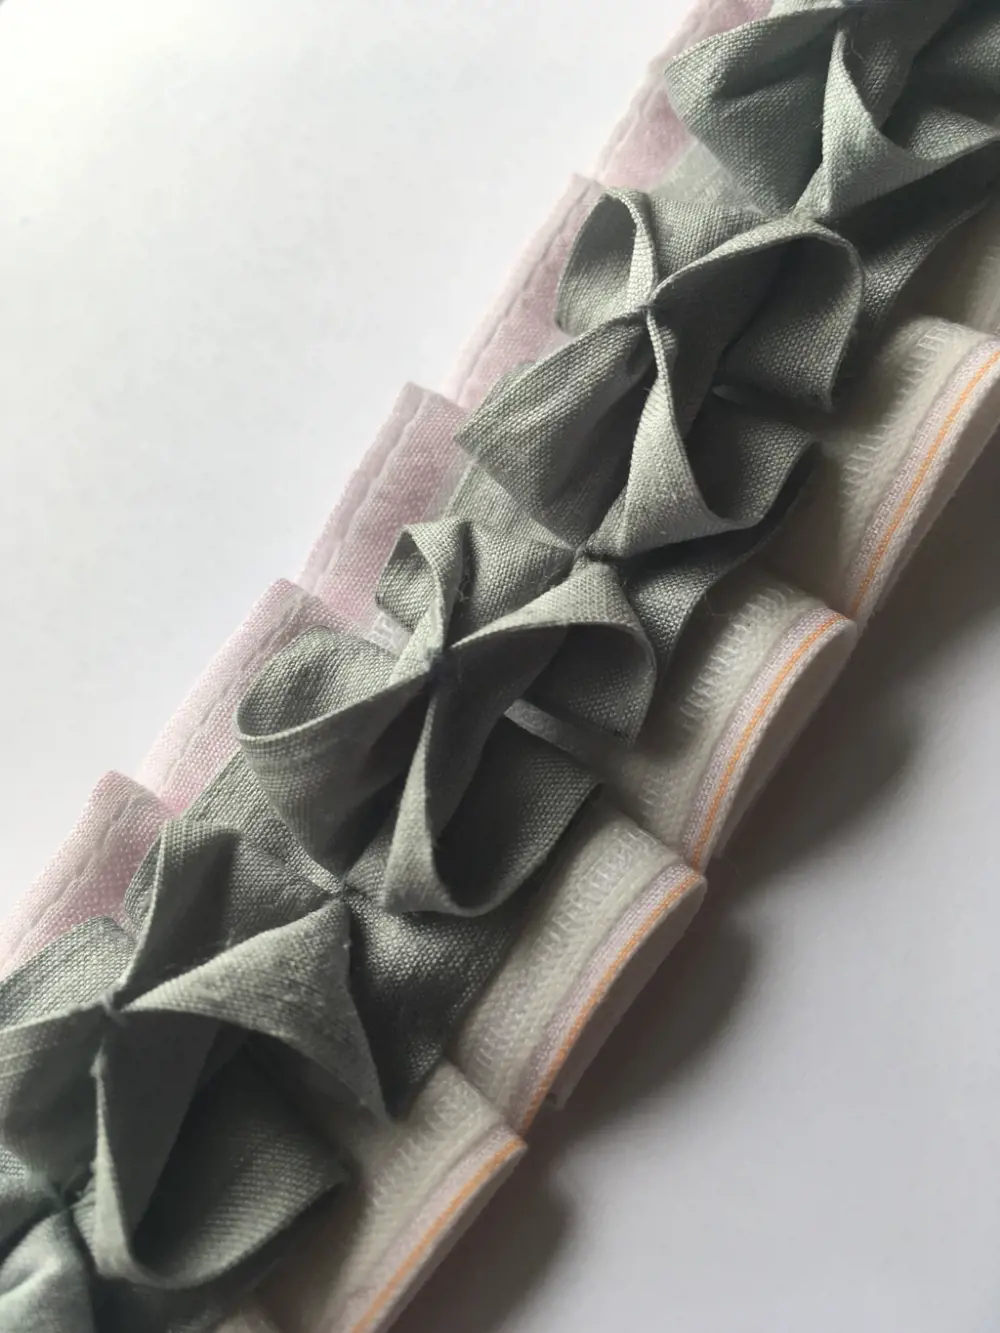
Ruching is a decorative technique commonly used in clothing and fabric manipulation. It involves gathering or pleating fabric in a way that creates a textured or ruffled effect. While ruching can add visual interest and dimension to garments, it requires skill to ensure that the ruching is evenly distributed and doesn't bunch up. Here are some techniques and tips to help you achieve a beautiful and professional result:
- Choose the right fabric: It's important to select a fabric that has enough stretch and recovery to enable the ruching effect. Fabrics like jersey, spandex, and silk with a touch of elastane work well for ruching. These fabrics allow you to gather the fabric without causing excessive tension or distortion.
- Pre-shrink the fabric: Before you start ruching, it's advisable to pre-shrink the fabric by washing and drying it. This helps prevent any further shrinkage or distortion once the garment is made, ensuring that the ruching remains even and doesn't become uneven due to fabric shrinkage.
- Mark the placement lines: To achieve evenly distributed ruching, it's helpful to mark placement lines on the fabric as a guide. You can use chalk or fabric markers to mark horizontal lines on the fabric, indicating where you want the ruching to start and end. These lines will serve as a reference for evenly spacing and gathering the fabric.
- Use parallel rows of stitching: When sewing the ruching, it's best to use parallel rows of stitching to gather the fabric. This distributes the tension evenly across the length of the garment, preventing any bunching or unevenness. Stitching two or more parallel rows also provides added stability and ensures that the ruching stays in place.
- Adjust the tension: The tension of the stitching plays a significant role in achieving evenly distributed ruching. Too much tension can cause the fabric to bunch up, while too little tension may result in loose or uneven ruching. Experiment with different tension settings on your sewing machine until you find the optimal balance that allows for smooth and even gathering.
- Take your time: Ruching requires patience and precision. Take your time to carefully gather the fabric, making sure that each pleat or fold is evenly spaced. Rushing through the process can lead to unevenness and frustration. It's better to work slowly and focus on creating even and consistent ruching.
- Practice on scraps: If you're new to ruching, it's a good idea to practice the technique on fabric scraps before applying it to your final garment. This allows you to familiarize yourself with the process and make any necessary adjustments before working on the actual fabric. It also gives you an opportunity to experiment with different stitching techniques or gathering methods to find what works best for you.
In conclusion, achieving evenly distributed and non-bunching ruching requires careful fabric selection, pre-shrinking, marking placement lines, using parallel rows of stitching, adjusting tension, taking your time, and practicing the technique. By following these tips and techniques, you can create beautifully ruched garments with a professional finish.
Creating a Stylish Parrot Dress: A Step-by-Step Guide
You may want to see also
![]()
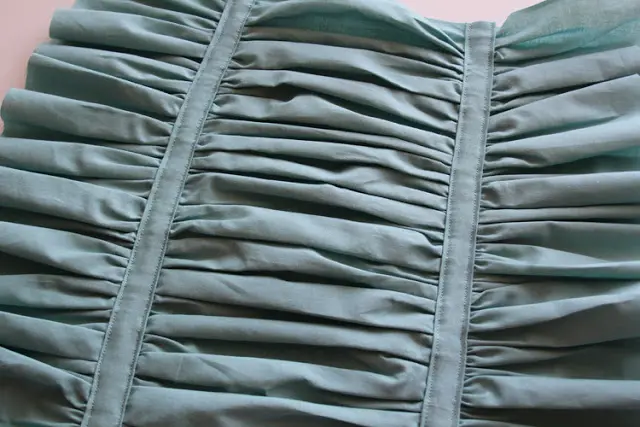
What are some different ways to incorporate ruching into a dress design?
Ruching is a technique commonly used in dressmaking to add texture, shape, and visual interest to garments. It involves gathering or pleating fabric together to create a gathered or manipulated effect. There are several different ways to incorporate ruching into a dress design, each providing a unique and eye-catching result. In this article, we will explore some of the most popular ways to incorporate ruching and how they can be used to create different effects.
Side Ruching: Side ruching is a popular technique that involves gathering or pleating fabric along the sides of a dress. This technique is often used to create a slimming effect, as the gathered fabric can help to camouflage any imperfections or create the illusion of a smaller waistline. Side ruching can be done in a variety of ways, including diagonal pleating, vertical gathering, or even creating a cascade effect with overlapping layers of gathered fabric. This technique can be used on different dress styles, including sheath dresses, A-line dresses, or even ballgowns.
Example: A knee-length sheath dress with side ruching along the waistline can create a flattering silhouette, accentuating the curves of the body while minimizing any tummy area.
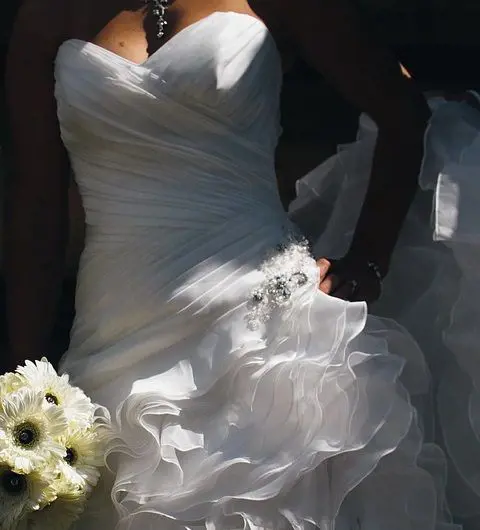
Front Ruching: Front ruching is another popular method for incorporating ruching into a dress design. This technique involves gathering or pleating fabric at the front of a dress, usually centered around the waistline or bust area. Front ruching can be used to create a focal point or add visual interest to a dress, as the gathered fabric creates a three-dimensional effect. It is often used in cocktail dresses, evening gowns, or even wedding dresses to add a touch of elegance and sophistication.
Example: A floor-length evening gown with front ruching at the bust can create a stunning and dramatic effect, drawing attention to the neckline and showcasing the figure.
Back Ruching: While not as commonly used as side or front ruching, incorporating ruching at the back of a dress can still yield beautiful results. Back ruching can be done in a variety of ways, including vertical gathering, diagonal pleating, or even creating a crisscross effect with overlapping layers of gathered fabric. This technique can add interest to the back of a dress, creating a unique and unexpected detail.
Example: A tea-length dress with crisscross back ruching can add a playful and flirtatious element to the design, making it perfect for a summer wedding or garden party.
Sleeve Ruching: Ruching can also be incorporated into the sleeves of a dress to add texture and visual interest. Sleeve ruching can be done in various ways, including gathering fabric along the length of the sleeves, creating pleats at the cuffs, or even adding ruching at the shoulder or elbow areas. This technique can be used to create a romantic and feminine look, adding volume and dimension to the sleeves.
Example: A knee-length cocktail dress with ruched elbow-length sleeves can create a vintage-inspired look, reminiscent of the 1940s or 1950s era.
In conclusion, there are several different ways to incorporate ruching into a dress design. Side ruching, front ruching, back ruching, and sleeve ruching are just a few examples of how this technique can be used to add texture, shape, and visual interest to a garment. By choosing the right type of ruching for each dress style and considering the desired effect, designers can create unique and eye-catching designs that will surely turn heads.
Flattering Fashion: How to Style Black Tights for Plus Size Figures
You may want to see also
![]()
Are there any variations or modifications I can make to traditional ruching techniques to create a unique look?
Ruching is a popular technique used in fashion to create texture and dimension on garments. Traditionally, ruching involves stitching fabric in a decorative pattern, then pulling the threads to gather the fabric and create ruffles or pleats. While the traditional ruching technique is beautiful on its own, there are several variations and modifications that can be made to create a unique look. In this article, we will explore some of these variations and provide step-by-step instructions and examples.
One way to modify traditional ruching is to experiment with different stitching patterns. Instead of stitching straight lines, you can create zigzag or curved lines to add more visual interest to the ruched area. For example, you can stitch a zigzag pattern in a diagonal direction to create a dynamic effect. This variation works well on sleeves or bodices of dresses, where the ruching can act as an embellishment.
Another modification that can be made to traditional ruching is to vary the width and spacing of the stitches. By stitching closer together, you can create tighter and more defined ruching. Conversely, stitching further apart will result in looser and more relaxed ruching. This variation can be useful when you want to achieve different levels of texture and volume on your garment. For instance, you can use tight ruching on the waistline of a dress to accentuate curves, while using looser ruching on the sleeves to create a softer look.
In addition to varying the stitching pattern and spacing, you can also experiment with adding additional elements to the ruched area. For example, you can incorporate beads, sequins, or pearls into the ruching stitches to create a glamorous and eye-catching effect. This variation is often used in evening gowns or bridalwear to add a touch of elegance and luxury.
Furthermore, you can try using different fabrics or materials for ruching to create contrast and texture. Instead of using the same fabric as the garment, you can opt for a sheer or lace fabric to create a more delicate and feminine look. Alternatively, you can use a contrasting fabric color to make the ruched area stand out. This variation can be particularly effective when used on collars, cuffs, or hemlines.
To create a unique look with ruching, you can also experiment with unconventional placement. Instead of ruching only on the front or back of the garment, you can try ruching on the sides or even around the neckline. This variation can create interesting and unexpected focal points on the garment.
In conclusion, there are numerous variations and modifications that can be made to traditional ruching techniques to create a unique look. By experimenting with stitching patterns, spacing, added elements, fabric choices, and placement, you can personalize and customize the ruching on your garments. So go ahead and unleash your creativity to take traditional ruching to the next level and create stunning and one-of-a-kind pieces.
The Perfect Wrap Color to Complement Your Burgundy Dress
You may want to see also
Frequently asked questions
To make ruching on a dress, you will need a sewing machine, thread, pins, and a strip of fabric that is double the length of the area you want to ruche. Start by pinning the strip of fabric along one side of the area you want to ruche, and then sew a straight line down the center of the strip. Next, pull one thread on each side of the stitch and gather the fabric along the thread until you achieve the desired ruching effect. Finally, secure the ruching by sewing another straight line over the gathered fabric.
Yes, you can make ruching on a dress without a sewing machine. Instead of using a sewing machine, you can use a needle and thread to sew the strip of fabric along one side of the area you want to ruche. Then, you can gather the fabric by hand and secure it with hand stitches. While it may take more time and effort, it is possible to achieve beautiful ruching without a sewing machine.
To make ruching on a dress look professional, there are a few tips you can follow. First, make sure that the fabric you use for the ruching is of good quality and matches the dress well. This will ensure a clean and polished look. Additionally, be careful not to gather the fabric too tightly, as this can create unsightly puckering. Finally, take your time when sewing the ruching and make sure to secure it well, as loose or uneven stitching can detract from the overall professional appearance.