
Are you tired of buying the same old shorts from the store, only to find that they don't fit quite right or aren't exactly your style? Well, fret no more! In this article, we will show you how to make your own short pants pattern so you can create the perfect pair of shorts that are tailored to your body and your personal taste. Whether you prefer a relaxed fit for lounging around or a more slim-fit silhouette for a night out, our step-by-step guide will have you well on your way to a custom-made pair of shorts in no time. So grab your measuring tape and your favorite fabric, because it's time to get sewing!
| Characteristics | Values |
|---|---|
| Length | Variable |
| Waistband Width | 2 inches |
| Waistband Elastic | 0.75 inches wide |
| Hemline | Straight |
| Inseam | 3 inches |
| Pockets | Optional |
| Fly Zipper | 5 inches |
| Closure | Button or snap |
| Fabric Type | Lightweight |
| Seam Allowance | 0.5 inch |
| Pattern Size | Range of sizes available |
| Rise | Low, mid, or high-rise |
| Waistband Style | Elastic or drawstring |
| Leg Shape | Straight or tapered |
| Belt Loops | Optional |
| Finishing Techniques | Topstitching, hemming, and serging |
| Fit | Loose or fitted |
| Crotch Depth | Variable |
| Style Options | Plain, printed, or patterned |
| Fabric Stretch | Non-stretch or stretchy |
What You'll Learn
![]()
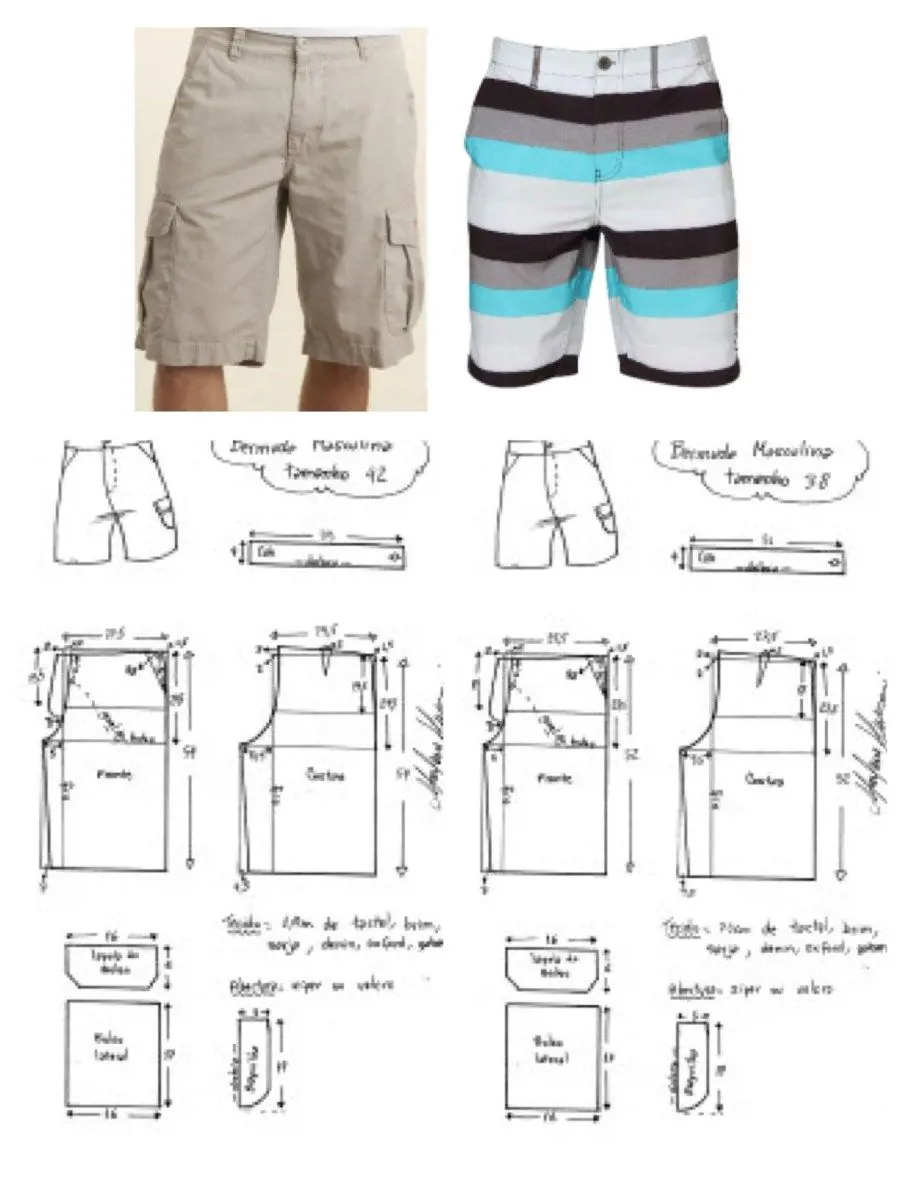
Measuring and cutting the fabric for your short pants pattern

One of the first steps in making your own short pants pattern is measuring and cutting the fabric. This crucial step ensures that your shorts will fit properly and look great when finished. Let's explore how to do it!
Before you begin, make sure you have all the necessary tools and materials. You will need a measuring tape, fabric scissors, pins, and of course, the fabric itself. Choose a lightweight and comfortable fabric, such as cotton or linen, for the best results.
Start by taking your measurements accurately. You will need to measure your waist, hips, and the length you want for your shorts. When measuring your waist, wrap the tape measure around the narrowest part of your waistline. For your hip measurement, wrap the tape measure around the fullest part of your hips. Finally, decide how long you want your shorts to be and measure from your waist to that desired length.
Once you have your measurements, transfer them onto your fabric. Begin by folding your fabric in half, with the right sides facing each other. This will ensure that your shorts are symmetrical. Lay the fabric flat on a stable surface and smooth out any wrinkles.
Using your measuring tape and a fabric pen, mark the measurements onto the fabric. Start by marking the waist measurement by measuring down from the folded edge of the fabric and making a small dot. Do the same for the hip measurement, keeping in mind that they should be wider than the waist. Finally, mark the desired length by measuring further down from the hip measurement dot.
Once you have marked all your measurements, it's time to cut the fabric. Carefully cut along the marked lines, making sure to stay as close to the lines as possible. Take your time and use sharp fabric scissors to ensure clean and precise cuts.
After cutting the fabric, unfold it and you should have a symmetrical pattern for your short pants. At this point, you can adjust the pattern if needed by trimming or adding additional fabric.
Now that you have your fabric pattern, it's time to proceed to sew it together. Pin the fabric pieces together, aligning the raw edges, and secure them in place. Remove the pins as you sew the pieces together, and follow a sewing pattern or tutorial for sewing shorts to complete your project.
Measuring and cutting the fabric is an essential step in creating a well-fitting pair of shorts. Taking accurate measurements and cutting the fabric precisely will ensure that your shorts look professional and fit comfortably. So take your time, follow these steps, and get ready to show off your new handmade short pants!
Can Elastic Bottom Pants Be Tailored? A Guide to Altering Your Favorite Comfortable Pants
You may want to see also
![]()
Sewing the seams and creating the waistband for your shorts

After you have taken measurements and drafted the pattern for your shorts, the next step is to sew the seams and create the waistband. This is an essential part of the sewing process, as it helps to give structure and shape to your shorts. Follow these steps to complete your shorts.
Step 1: Cut out the fabric pieces
Using the pattern you drafted, cut out the fabric pieces for your shorts. Make sure to cut the front and back pieces as well as any other necessary pieces such as pockets or waistband extensions.
Step 2: Pin and sew the seams
With right sides together, pin the front and back pieces of the shorts together along the side seams and inseam. Use a straight stitch and a ⅝ inch seam allowance to sew the seams. Finish the raw edges by serging or using a zigzag stitch.
Step 3: Press the seams
After sewing the seams, press them open with an iron. This will help to give a professional finish to your shorts and make them look polished.
Step 4: Create the waistband
To create the waistband, fold the top edge of the shorts down to the wrong side by about 1 ¼ inches. Press the fold in place. Then, fold the edge down by another 1 ¼ inches to encase the raw edge. Press the fold in place and pin it to secure.
Step 5: Sew the waistband
Starting at one of the side seams, sew along the bottom edge of the waistband, about ⅛ inch from the fold. Continue to sew all the way around the waistband, backstitching at the starting point to secure the stitching.
Step 6: Create an opening for the elastic
Using a seam ripper, open a small section of the waistband stitching along the backside of the shorts. This will create an opening to insert the elastic.
Step 7: Insert the elastic
Cut a piece of elastic that is the same length as your waist measurement. Attach a safety pin to one end of the elastic and thread it through the opening in the waistband. As you thread the elastic through, make sure to keep it flat and untwisted. Once the elastic is threaded through, overlap the ends by about 1 inch and securely sew them together.
Step 8: Close the opening
Once the elastic is securely attached, use a needle and thread to sew the opening in the waistband closed. Make sure to sew close to the edge to ensure a neat finish.
Step 9: Finish the hem
Fold the bottom edge of the shorts up by about 1 inch and press the fold in place. Then, fold the edge up by another 1 inch to encase the raw edge. Press the fold in place and pin it to secure. Sew along the fold, about ⅛ inch from the edge, to create the hem.
And there you have it, your shorts are complete! By following these steps, you can sew the seams and create the waistband for your shorts with ease. Remember to take your time and pay attention to the details for a professional-looking finished product. Happy sewing!
The Top 10 Jogger Pants to Pair with Your Fresh Jordans: A Style Guide
You may want to see also
![]()
Adding pockets and details to customize your short pants pattern
When it comes to sewing your own shorts, one of the most fun and versatile aspects is the ability to customize them with pockets and other details. Not only does adding pockets to your shorts make them more functional, but it also adds a unique and personalized touch to your garment. In this article, we will walk you through the steps to add pockets and other details to your short pants pattern.
Before we get started, you will need your basic short pants pattern. If you don't have one yet, you can either use a commercial pattern or make your own by tracing an existing pair of shorts onto paper. Once you have your pattern, follow these simple steps to add pockets and other details:
- Choose your pocket style: There are various pocket styles you can choose from, such as patch pockets, welt pockets, or even zippered pockets. Consider the functionality and aesthetic you're going for to select the best pocket style for your shorts.
- Prepare your pattern: Using a tape measure, mark the desired position and size of your pockets on your shorts pattern. Make sure to consider the garment's seam allowances when placing your pocket placements.
- Cut out the pocket pieces: To create the pocket pieces, you will need to cut fabric according to your desired pocket size and style. For patch pockets, cut two identical pieces of fabric in the desired shape and size. For welt pockets, you will need to cut pocket facing pieces and pocket bag pieces.
- Prep and sew the pockets: Depending on the pocket style, you will need to prepare and construct the pockets. For patch pockets, fold and press the edges of the pocket pieces for a clean finish. Then, place the pocket pieces right sides together on the front shorts panel, aligning the marked positions. Sew around the edges of the pocket, leaving the top or side open for access.
For welt pockets, follow a detailed tutorial on constructing welt pockets, as it requires precise measurements and sewing techniques.
- Finishing the pocket: After attaching the pocket pieces to the shorts, press the seams flat and trim any excess fabric. To ensure the pocket stays in place during wear, you can consider topstitching around the pocket opening or adding bartacks at the corners for extra reinforcement.
- Add other details: Pockets are just one way to customize your shorts. There are plenty of other details you can add, such as belt loops, decorative trims, or even a drawstring waistband. Whatever details you choose, make sure to plan and incorporate them into your shorts pattern before cutting and sewing the fabric.
Remember to take your time and be precise when adding these details. Pockets and other customizations can add significant value to your shorts, but they require careful execution to achieve a professional and polished look. Take the opportunity to experiment and let your creativity shine through your custom shorts.
In conclusion, adding pockets and other details to your short pants pattern is a fantastic way to make your garment unique and functional. By following these simple steps, you can easily incorporate pockets, belt loops, and other customizations into your shorts. Remember to choose the right pocket style for your needs, prepare and sew the pockets accurately, and add any other desired details before cutting and sewing the fabric. Enjoy the process of creating your own personalized shorts, and happy sewing!
Can Leggings Be Worn as Pants? Debunking the Fashion Debate
You may want to see also
![]()
Hemming and finishing touches for a professional look

So you've made a pair of short pants using your own pattern and you're almost done with the sewing process. The last few steps involve hemming the bottom edge of the pants and adding some finishing touches to give them a professional look. Here's how to do it:
- Measure Twice, Cut Once: Before you start hemming, make sure to try on the pants and determine the desired length. Mark this length with a pin or chalk. It's always a good idea to measure twice to ensure accuracy before cutting off any excess fabric.
- Preparing the Hem: Fold the bottom edge of the pants up to the desired length, using the pin or chalk mark as a guide. It's recommended to fold the fabric up by about 1 inch to ensure a clean and sturdy hem. Press the folded edge with an iron to create a crisp fold.
- Stitching the Hem: Once the fabric is properly folded, it's time to stitch the hem in place. You can use a sewing machine for this step or opt for hand sewing if you prefer. If using a sewing machine, select a stitch suitable for hemming, such as a straight stitch or a blind hem stitch. Sew along the folded edge, making sure to catch both layers of fabric. Take your time and pay attention to keeping the stitches even and straight.
- Finishing the Raw Edge: After sewing the hem, you might notice that the raw edge is still visible on the inside of the pants. To give the pants a neat and professional finish, you can use a serger or overlocker to finish the raw edge. If you don't have one, you can employ a zigzag stitch on your sewing machine instead. This will help prevent fraying and give the inside of the pants a clean look.
- Pressing the Hem: Finally, give the hem one last press with an iron to ensure it lays flat and looks polished. This step helps to set the stitches and gives the pants a finished appearance. Be careful not to press too hard or you might create unwanted creases or distort the fabric.
By following these steps, you can hem your short pants and add the finishing touches that will give them a professional and polished look. Remember to take your time and pay attention to detail to achieve the best results. Now you're all set to show off your handmade short pants with pride!
Master the Art of Clipping Trouser Hangers with Ease Using Pant Leg Techniques
You may want to see also


