Sock blockers are indispensable tools for knitters and crocheters. They are used to fine-tune the shape of handmade socks. You can make your own sock blockers at home using a variety of materials such as cardboard, plastic, foam sheets, or even wire hangers. The process is relatively simple and can be done within minutes, with some methods taking less than 30 minutes to complete. By making your own sock blockers, you can save money and ensure that your handmade socks are blocked to perfection.
What You'll Learn
![]()
Using cardboard and duct tape
Sock blockers are indispensable tools for knitters or crocheters, used to fine-tune the shape of handmade socks. You can make your own sock blockers using cardboard and duct tape. Here's a step-by-step guide:
Materials:
- 2 pieces of sturdy cardboard
- 1 roll of duct tape in your desired print or colour
- A sock with a slightly loose, comfortable fit (it can be a store-bought sock)
- A pair of heavy-duty craft scissors
- Pins
- Pencil
Instructions:
- Place your cardboard on a soft surface that you can stick pins into, such as a folded towel.
- Lay your sock flat on top of the cardboard and pin it in place by sticking the pins through the sock, the cardboard, and the towel.
- Trace around the sock with a pencil and then unpin the sock.
- Use your scissors to cut out the shape you've drawn on the cardboard.
- Lay this cutout on top of your second piece of cardboard and trace around it to ensure both blockers are the same size and shape.
- Now, cover the cardboard sock cutouts with duct tape. This strengthens the sock blocker and makes it waterproof. Start by wrapping a few strips of duct tape around the "leg" of the sock shape, slightly overlapping each strip.
- For the heel, use narrower strips of tape. Cut or tear a strip of tape longer than the heel is wide, then cut or tear it in half lengthwise. Place one of the half-strips on the cardboard heel, ensuring the end of the tape on the front of the ankle overlaps the previous strip more than the end on the heel.
- Fold the ends of the strip around the edge of the cardboard and to the other side, so they fold under diagonally.
- Flip the blocker over and repeat with the other half-strip of tape. Continue covering the heel until it is fully taped on both sides.
- Cover the straight part of the foot with tape in the same manner as the leg. Stop when you reach the toe area.
- Place another half-strip of tape perpendicular to the previous strip, wrapping it around the end of the toe and overlapping the previous strip at both ends.
- For the toe, you will need quarter-strips. Cut or tear each length of tape into four pieces lengthwise. Centre your strip on the edge of the cardboard, slightly overlapping the previous strip. Place another diagonal toe strip to create a mirror image of the first strip, forming an "X" on the front and back of the toe.
- Continue taping the toe area until it is fully covered.
- Finally, seal the "cuff" (top edge of the leg) to make it waterproof. Cut a piece of tape as long as the cuff is wide and place the cuff edge of the cutout on top of the tape so it covers about half of the width. Fold the rest of the tape to the other side, encasing the edge of the cardboard.
Now, simply insert your new sock blockers into your socks, spray them lightly with water, and allow them to dry. You can also hold a steaming iron 2-3 inches above the socks to speed up the drying process.
Crafting Sock Snowmen: A Rice-Filled Winter DIY Project
You may want to see also
![]()
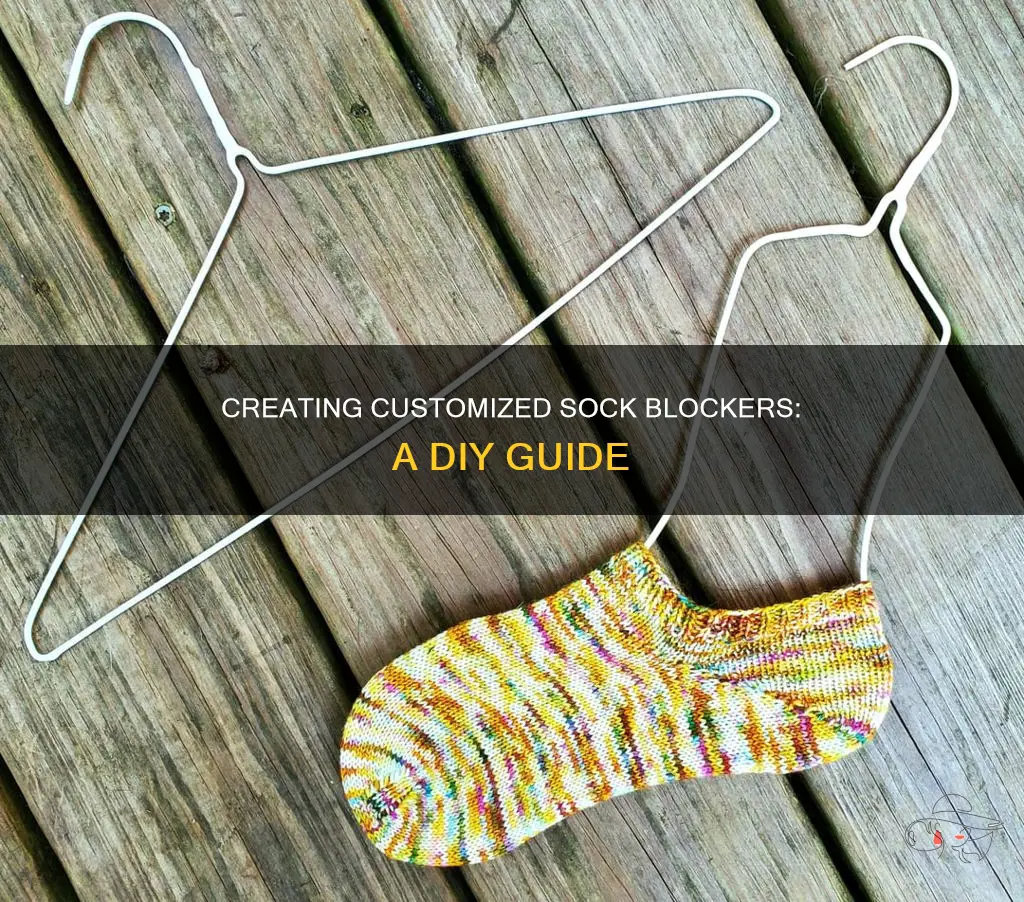
Using a wire hanger
To begin, you will need to straighten out the wire hanger to form a long, straight piece of wire free from bends or kinks. You can do this by carefully pulling and stretching the wire hanger with your hands. Once you have a straight piece of wire, measure out the desired length for your sock blocker. Keep in mind that you will need some extra wire at the end to create a hook for hanging.
Now, it's time to start shaping your sock blocker. First, find the centre of the wire and push that point inward to create the toe of the blocker. You can use a small round object, such as a plant pot, to help shape the wire into a smooth curve. Next, locate point B for your desired width of the foot portion of the blocker and push the wire inward to create the shape of a foot. Continue this process, locating points along the wire and pushing them inward to form the shape of a sock, including the heel and cuff.
Once you are happy with the size and shape of your sock blocker, it's time to secure the wire ends together. Use pliers to tightly twist the ends of the wire around each other, ensuring that the connection is strong enough to hold the shape. Finally, create a hook for hanging by twisting the ends of the wire around each other for about 6 inches and bending it into a hook shape. You can use needle stoppers or something similar to cover the sharp end of the hook if needed.
To ensure your homemade sock blocker is both sturdy and comfortable to use, you may want to file down any rough edges with sandpaper or a metal file. You can also wrap the wire frame with electrical tape or duct tape to provide an additional layer of protection for your socks.
And that's it! You now have a custom-made sock blocker that is ready to use. Enjoy blocking your handmade socks and achieving a professional-looking finish.
Creating Cute Sock Babies: A Step-by-Step Guide
You may want to see also
![]()
Using a foam sheet
Thick foam sheets are a great option for making sock blockers. Aim for a thickness greater than 3mm to ensure durability.
Here's a step-by-step guide:
Step 1: Create a Template
Start by taking a sheet of paper larger than your sock. Place the sock on the paper and spread it out as much as possible. Trace around the sock, leaving a 6mm gap around the edges. Cut out the custom template.
Step 2: Transfer to Foam
Cut a foam sheet to match the size of the paper template. Trace the template onto the foam sheet, and cut it out. You can extend or shorten the length and width of the pattern as needed.
Step 3: Use the Sock Blocker
Your foam sock blockers are now ready! Simply fit the socks onto the blockers and hang them to dry. This method may cause the socks to take longer to dry, and the moisture may cause wear and tear on the foam over time.
Alternative Methods
For a more durable option, you can use wire hangers or cardboard to make sock blockers. Cardboard is lightweight and easy to cut, but it may not hold up well over time, especially with moisture. Wire hangers can be shaped into the desired form, but they may lack stability and durability.
Overall, using a foam sheet is a simple and cost-effective way to make your own sock blockers, ensuring your handmade socks dry in the desired shape.
Creating Grip Socks for Soccer: A DIY Guide
You may want to see also
![]()
Using plastic
Sock blockers are essential tools for knitters, ensuring handmade socks are shaped perfectly. They are typically made from sturdy materials like wire, wood, or plastic, resembling the shape of a sock.
If you're looking to make sock blockers using plastic, you can follow these steps:
Step 1: Draw a Template
Place a knitted sock on a blank sheet of paper and trace around it, leaving about a 1/4-inch (6mm) border around the outer edge. This means that your blocker template should be slightly larger than your actual sock, allowing the fabric to stretch. Make sure to draw the template slightly larger if you feel the sock needs more room to stretch.
Step 2: Trace the Template onto Plastic
Once you have your template ready, it's time to transfer it onto a piece of plastic. You can use a variety of plastic sources, such as old placemats, an old spiral calendar book, or quilter's template plastic from craft stores. Choose a plastic that is stiff enough to hold its shape but not too floppy.
Step 3: Cut Out the Plastic Sock Blocker
Carefully cut out the plastic along the traced lines. Take your time with this step to ensure a precise cutout. You can use scissors or a craft knife, depending on the thickness and type of plastic you're using.
Step 4: Smooth Out Rough Edges
After cutting out your plastic sock blocker, use a nail file or sandpaper to smooth out any rough edges. This step is important to prevent snagging or damaging your socks when you use the blocker. You may also want to cover the edges with tape to ensure a smooth finish and add extra protection for your socks.
Step 5: Test and Adjust
Before using your new plastic sock blocker, test its stability by giving it a gentle shake. Ensure that all parts of the blocker are securely attached and there is no wobbling. If needed, reinforce any loose connections with additional tape or glue.
Step 6: Block Your Socks
Now that your plastic sock blocker is ready, it's time to block your handmade socks. Insert the blocker into the sock and spray the sock lightly with water on both sides. Allow the sock to dry on the blocker, helping it retain its desired shape. You can also use a steaming iron held 2-3 inches away from the sock to aid in the drying process, but be careful not to let the iron touch the damp sock.
Crafting Cute Sock Animals: No-Sew, Easy Instructions for Adorable Creations
You may want to see also
![]()
Using a towel
If you're looking to block your socks without sock blockers, you can use a towel. Here's a step-by-step guide:
Wet Method:
- Soak your socks in a bowl of lukewarm or cool water for about 20 minutes. Avoid hot water as it can damage the fibres or felt them. You can add a small amount of wool wash or gentle detergent suitable for woollens, but it's not necessary.
- Gently squeeze the excess water out of the socks. Do not wring them. You can fold them up and give them a good squeeze.
- Rinse the socks in fresh, clean water to remove any detergent. Again, avoid hot water.
- Give the socks another good squeeze to remove as much water as possible.
- Place the damp socks on a towel and gently pull them into shape.
- Cover the socks with a dry tea towel.
- Set your iron to a high heat setting.
- Gently press the iron onto the tea towel-covered socks. Do not press down hard. Go lightly, pressing gently and lifting the iron often. This will help set the stitches into shape and remove any creases.
- Let the socks dry completely.
Dry Method:
- Shape the sock, making sure the heel flap is pushed into shape and the toe decrease seams are lined up.
- Soak a tea towel and place it over the sock, avoiding the cuff.
- Set your iron to a high heat setting.
- Gently press the iron onto the tea towel-covered sock. Do not press down hard. Go lightly and lift the iron often to avoid crushing the stitches.
- Let the sock dry.
General Tips:
- Blocking is the process of stretching and shaping finished socks to make the stitches more even and to showcase patterns.
- You can use a towel to help shape and dry your socks, but sock blockers are designed to provide a more precise and consistent shape.
- If you want to make your own sock blockers, you can use materials like cardboard, plastic, foam, or puzzle mats.
Crafting Cute Sock Animals: DIY Guide
You may want to see also
Frequently asked questions
You can use cardboard, plastic, foam sheets, or wire hangers. You will also need a pair of heavy craft scissors, a pencil, pins, and duck tape.
Place your cardboard on a soft surface that you can stick pins into (a folded towel works well). Lay your sock flat on top of the cardboard. Pin the sock to the cardboard by sticking the pins through the sock, the cardboard, and your soft surface. Trace around the sock with your pencil and unpin the sock. Cut the shape out, then lay this cutout on top of your second piece of cardboard and trace around it. Cover the cardboard sock cutout with duck tape to strengthen the sock blocker and make it waterproof.
Trace around your foot on a sheet of paper. Find the widest measurement and the length. Reduce these measurements by 10% and use them to sketch a sock blocker on a piece of card. Trace this onto a piece of plastic and cut it out.
Print out a sock blocker template in the appropriate size. Hold your completed sock over the printed template to determine which outline matches the sock the best. Cut the template out, then trace it onto the foam sheet. Cut the foam sheet out.
Locate the center along the long side of the hanger. Push point A inward to the center, then locate point B for your desired width of the foot portion of the blocker. Continue to push points A and B to form the shape of a foot, then locate point C for your desired width for the leg portion of the blocker. Keep tweaking until you are happy with the size and shape, then repeat the process to make the second one.


