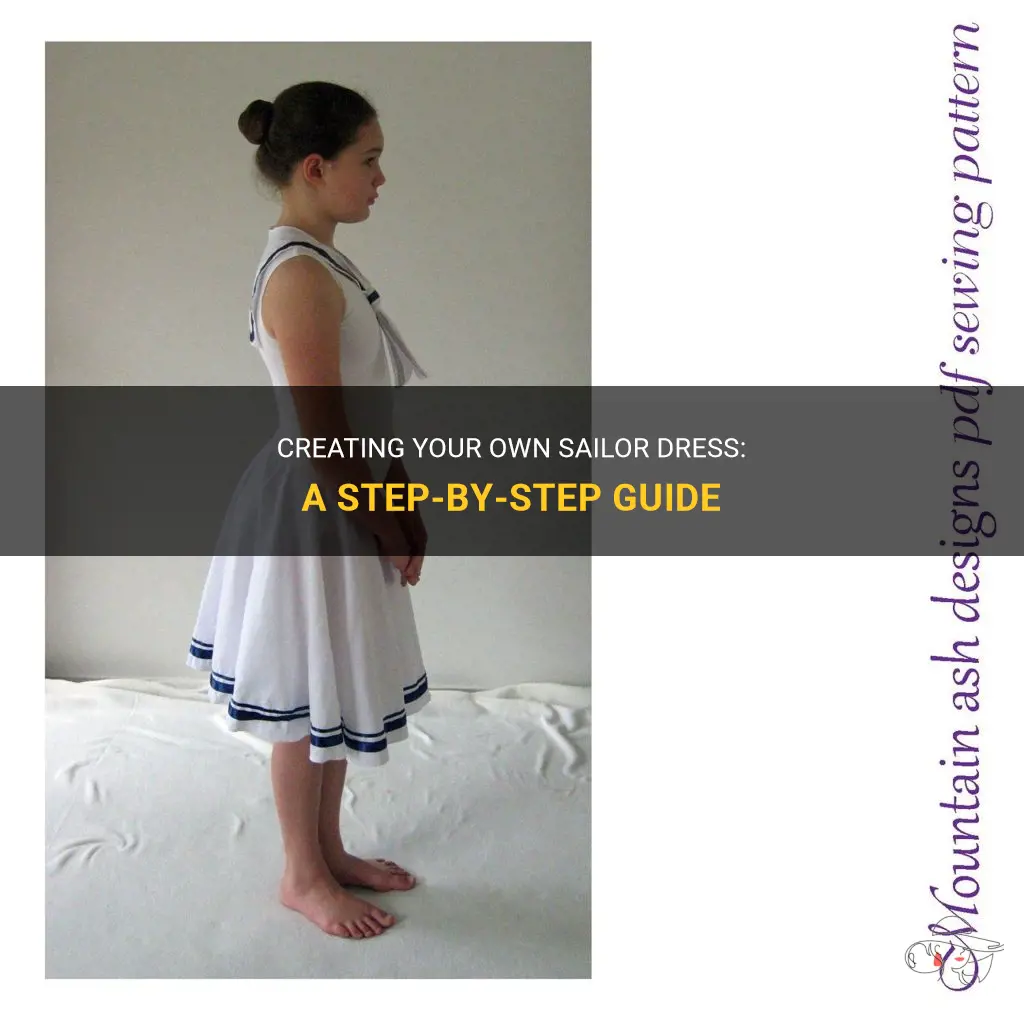
Have you ever wanted to feel the nostalgic spirit of the seaside and channel your inner sailor? Well, look no further because today, we are going to dive into the delightful world of DIY fashion and learn how to make your very own sailor dress. Incorporating timeless elements like crisp collars, nautical color schemes, and playful accents, this classic garment is sure to make a statement wherever you go. So, grab your sewing kit and sail away with us as we embark on a creative adventure and bring a touch of maritime charm into your wardrobe!
| Characteristics | Values |
|---|---|
| Material | Cotton |
| Color | Navy Blue |
| Size Range | XS - XL |
| Skirt Length | Knee-length |
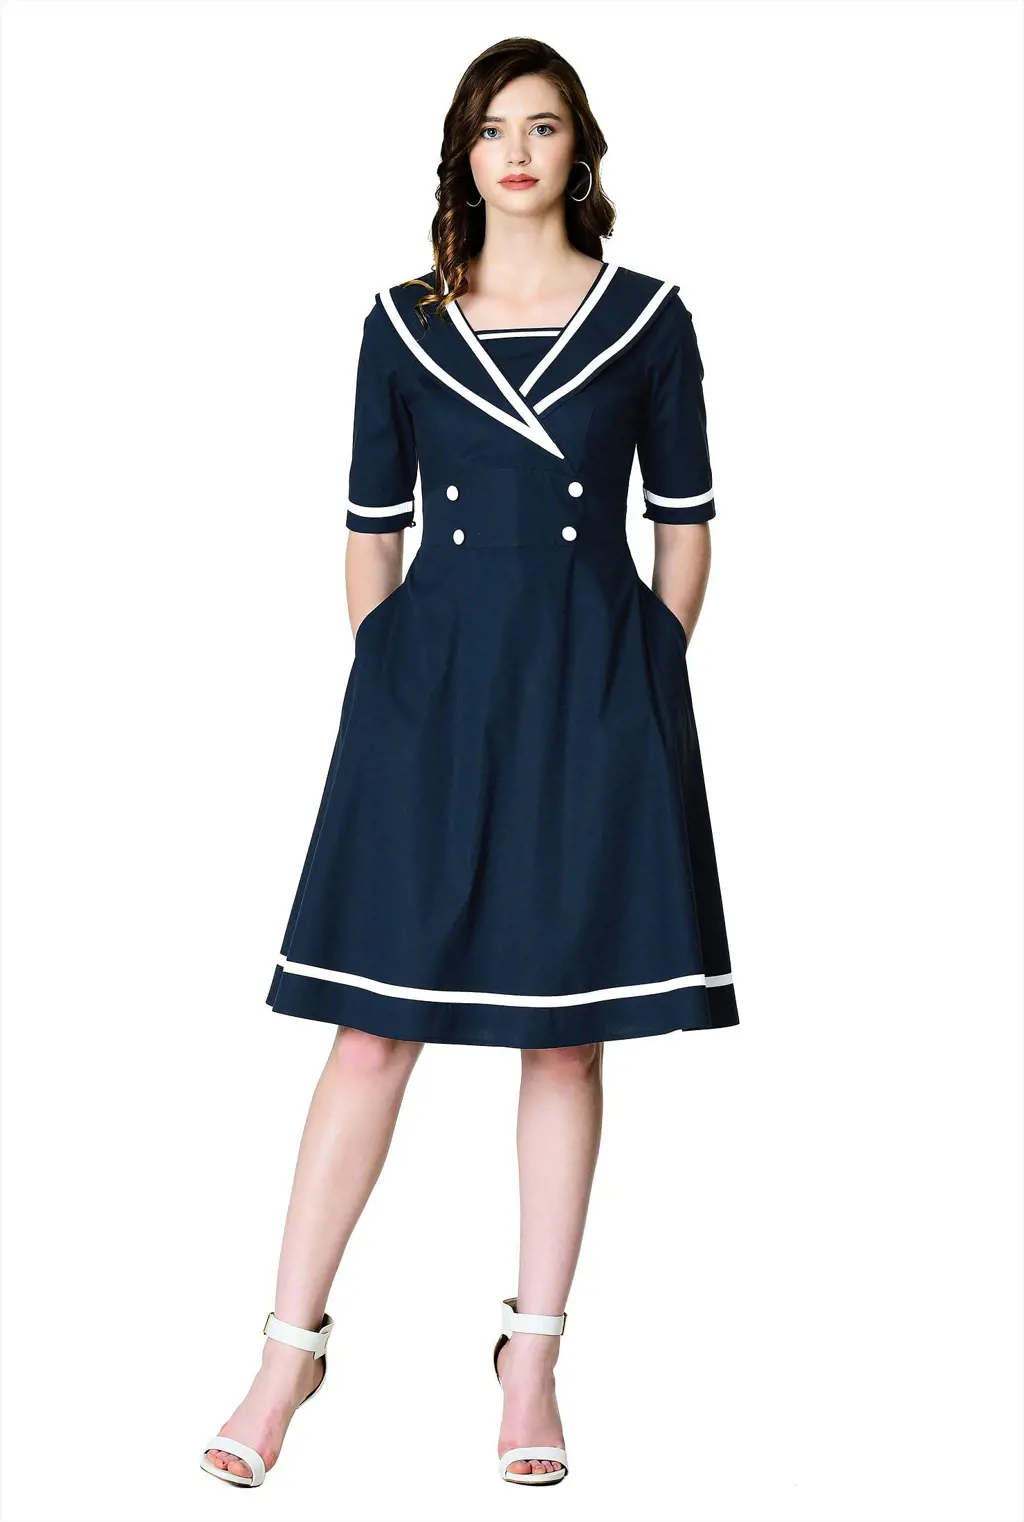
| Neckline | Peter Pan collar |
| Sleeve Length | Short sleeves |
| Waistline | Drop waist |
| Closure | Back zipper |
| Embellishments | Embroidered anchor |
| Pockets | Side pockets |
| Care Instructions | Machine washable |
| Season | Suitable for all seasons |
| Occasion | Casual or semi-formal |
| Style | Classic and timeless |
| Hemline | Straight |
| Belt | Optional belt included |
| Lining | Fully lined |
| Pattern | Solid |
| Accessories | Can be paired with a ribbon bow |
| Customization Options | Can be made with a different fabric or color |
| Price Range | $50 - $100 |
| Difficulty Level | Intermediate |
| Sewing Skills Required | Basic sewing skills |
| Time Required | 4-6 hours |
| Recommended Tools | Sewing machine, scissors, pins, measuring tape, iron, sewing needles |
| Recommended Techniques | Gathering, hemming, attaching a collar |
| Additional Notes | Can be dressed up or down with accessories |
What You'll Learn
- What materials and supplies do I need to make my own sailor dress?
- Are there any sewing patterns available for making a sailor dress?
- What are the basic steps involved in sewing a sailor dress?
- Are there any tips or tricks for adding authentic sailor dress details, such as a collar and sailor-style collar flaps?
- How can I customize and personalize my sailor dress to make it unique?
![]()
What materials and supplies do I need to make my own sailor dress?

Sailor dresses are a timeless and iconic fashion choice, perfect for a wide range of occasions. Making your own sailor dress can be a rewarding project that allows you to customize the design and fit to your liking. To begin your dressmaking journey, you will need the following materials and supplies:
- Fabric: Choose a fabric that is suitable for a sailor dress, such as cotton, linen, or a blend of these materials. Opt for a medium-weight fabric that holds its shape well. Consider the color and pattern that you desire for your dress, keeping in mind the classic elements of a sailor dress.
- Pattern: Look for a sailor dress pattern that suits your style. The pattern will provide you with the necessary measurements and cutting instructions to create your dress. You can find patterns at fabric stores, online pattern shops, or by using vintage sewing patterns.
- Measuring tools: Ensure you have a tape measure to accurately measure your body dimensions, including bust, waist, and hips. Additionally, you may need a tailor's chalk or fabric marker to mark the fabric before cutting.
- Scissors: Invest in a good pair of fabric scissors specifically designed for cutting fabric. Sharp scissors will give clean edges and prevent fraying.
- Needles and thread: Have a variety of sewing needles on hand, including hand-sewing needles for small detail work and machine needles for your sewing machine. Select thread that matches your fabric color or choose a contrasting color for a decorative touch.
- Pins: Use straight pins to hold the fabric pieces together before sewing. Opt for fine pins that won't leave large holes in your fabric.
- Sewing machine: A sewing machine is essential for creating professional-looking seams and hems. Ensure your machine is in good working condition and set up with the appropriate thread and needle for your fabric.
- Iron and ironing board: Pressing your fabric before and after sewing is crucial for achieving crisp, polished results. An iron and ironing board will help you achieve smooth seams and neatly pressed hems.
- Closure options: Consider the type of closure you want for your sailor dress, such as buttons, a zipper, or hooks and eyes. Purchase the appropriate closures along with any necessary interfacing or lining materials.
- Embellishments: To add extra details to your sailor dress, you may want to consider embellishments such as ribbon, lace, or decorative buttons. These can be used to create the classic collar and sleeve details often seen on sailor dresses.
Once you have gathered all the necessary materials and supplies, you can begin the process of making your own sailor dress. Follow the instructions provided by your chosen pattern, carefully cutting the fabric pieces and sewing them together. Pay attention to the finishing touches, such as hemming and adding closures, to ensure a professional-looking result.
By making your own sailor dress, you can create a unique and personalized garment that reflects your individual style. Enjoy the process of dressmaking and the satisfaction of wearing your own handmade creation.
Matching Pedicure Colors with a Navy Dress: A Guide to Perfect Pairings
You may want to see also
![]()
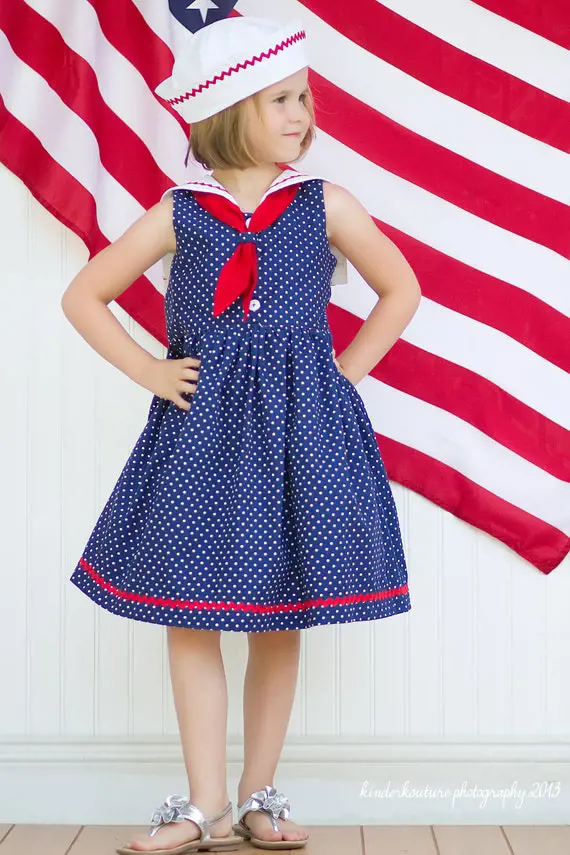
Are there any sewing patterns available for making a sailor dress?
Sailor dresses are a popular choice for both children and adults, thanks to their classic and timeless design. If you are a sewing enthusiast looking to try your hand at making a sailor dress, you're in luck! There are plenty of sewing patterns available that make the process easy and enjoyable.
Sewing patterns are vital when it comes to creating the perfect sailor dress. These patterns provide you with a guide on how to cut and sew the fabric pieces together, ensuring that the dress fits well and looks great. When selecting a sewing pattern for a sailor dress, you have several options to choose from.
One popular option is to search for sewing patterns specifically designed for sailor dresses. Many sewing pattern companies offer designs inspired by the iconic sailor dress, complete with the characteristic sailor collar and nautical details. These patterns are often available in various sizes, allowing you to create a sailor dress for a child or an adult.
If you prefer a more custom-made approach, you can modify an existing sewing pattern to achieve the sailor dress look. For example, you can start with a basic dress pattern and add a sailor collar or decorative elements such as anchor-shaped buttons or striped fabric accents. This method allows you to exercise your creativity and make a one-of-a-kind sailor dress.
When using a sewing pattern to make a sailor dress, it's important to follow the instructions step-by-step. Sewing patterns typically include a list of materials needed, detailed measurements, and clear instructions on how to cut and sew the fabric. By closely following these instructions, you can ensure that the final dress is well-made and meets your expectations.
To give you a better idea of the process, let's go through a step-by-step example of making a child-sized sailor dress using a sewing pattern:
- Start by selecting a suitable sewing pattern for a child-sized sailor dress. Choose a size that matches the child's measurements and ensure that the pattern includes all the desired elements, such as a sailor collar and pleated skirt.
- Gather all the necessary materials, including the recommended fabric type (often cotton or linen), a suitable thread color, buttons for embellishment, and any required interfacing or trim.
- Take accurate measurements of the child's chest, waist, and height, and select the corresponding size according to the sewing pattern's measurement chart.
- Cut out the fabric pieces according to the pattern's instructions, making sure to transfer any markings or notches onto the fabric.
- Follow the pattern's instructions on how to assemble the fabric pieces, starting with the collar and then attaching it to the dress bodice. Pay close attention to seam allowances, pressing directions, and any additional steps such as hemming or inserting a zipper.
- Once the dress is assembled, add any decorative elements such as buttons or trim according to the pattern's recommendations.
- Finally, try the dress on the child to check for proper fit and make any necessary adjustments. This step ensures that the dress sits well on the child's body and allows for freedom of movement.
By following these steps and using a sewing pattern, you can create a beautiful sailor dress that fits perfectly and showcases your sewing skills. Whether you choose a pre-designed pattern or modify an existing one, making your own sailor dress is a rewarding and enjoyable project. So grab your sewing machine, gather your supplies, and get ready to sew a timeless and stylish sailor dress!
The Process of Dressing a Chicken: How Long Does it Take?
You may want to see also
![]()
What are the basic steps involved in sewing a sailor dress?
Sewing a sailor dress is a fun and rewarding project for anyone interested in making their own clothes. This classic style dress is synonymous with nautical fashion and has been a popular choice for many years. Whether you are an experienced sewer or a beginner, there are a few basic steps involved in sewing a sailor dress.
- Choose the right fabric: The first step in sewing a sailor dress is to choose the right type of fabric. Traditionally, sailor dresses are made from lightweight cotton or linen fabric. These fabrics are breathable and comfortable, making them ideal for warmer weather. It is important to select a fabric that has enough drape and structure to create the desired silhouette.
- Take accurate measurements: Before you can start sewing, you need to take accurate measurements of the person who will be wearing the dress. This will ensure a perfect fit. Measure the bust, waist, hips, and length of the dress. Use these measurements to create a pattern or adjust an existing pattern to fit.
- Prepare the pattern: Once you have the measurements, you can prepare the pattern. If you are using a commercial pattern, follow the instructions to cut out the appropriate size. If you are using a pattern you created, use the measurements to draw the pattern pieces on paper or cardboard. Make sure to include seam allowances and any darts or pleats.
- Cut out the fabric: After the pattern is prepared, it's time to cut out the fabric. Lay the fabric flat on a cutting table or the floor and pin the pattern pieces in place. Use sharp fabric scissors to carefully cut out each piece. Take your time to ensure clean and even cuts.
- Sew the bodice: Start by sewing the bodice of the dress. This involves sewing the front and back pieces together, creating the armholes, and adding any darts or pleats. Follow the pattern instructions carefully to ensure an accurate fit. Press the seams open and finish the raw edges with a serger or zigzag stitch.
- Attach the skirt: Once the bodice is complete, it's time to attach the skirt. Pin the skirt pieces to the bodice, matching the notches or markings on the pattern. Sew the skirt to the bodice, starting at the waistline. Press the seam allowances towards the bodice and finish the raw edges.
- Add the collar and cuffs: Next, add the collar and cuffs to the dress. This is where the classic sailor style comes to life. Follow the pattern instructions to attach these pieces correctly. Press the seams open and finish the raw edges.
- Hem the dress: The final step is to hem the dress. Fold up the bottom edge of the skirt and press it in place. Sew a straight stitch along the folded edge to secure the hem. Trim any excess fabric and finish the raw edge.
By following these basic steps, you can sew a beautiful sailor dress that will be a timeless addition to your wardrobe. Remember to take your time, follow the pattern instructions carefully, and enjoy the process of creating your own clothes. With practice, you will become more confident in your sewing skills and be able to tackle more complex projects. So, grab your sewing machine and start stitching your own sailor dress today!
Creating the Perfect Suzy Bishop Dress: A Step-by-Step Guide
You may want to see also
![]()
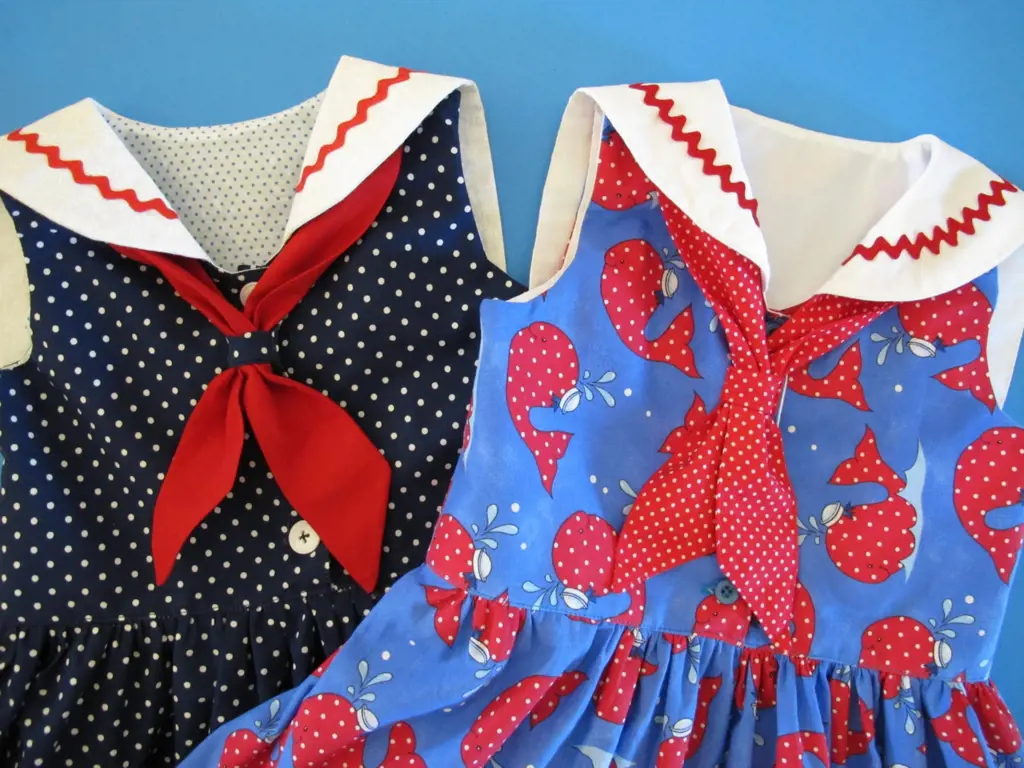
Are there any tips or tricks for adding authentic sailor dress details, such as a collar and sailor-style collar flaps?
Adding authentic sailor dress details, such as a collar and sailor-style collar flaps, can give your dress a charming and classic look. Whether you're making a costume or a fashion statement, these details can elevate your garment to the next level. In this article, we will explore some tips and tricks for adding these details in a way that enhances the authenticity and overall look of your sailor dress.
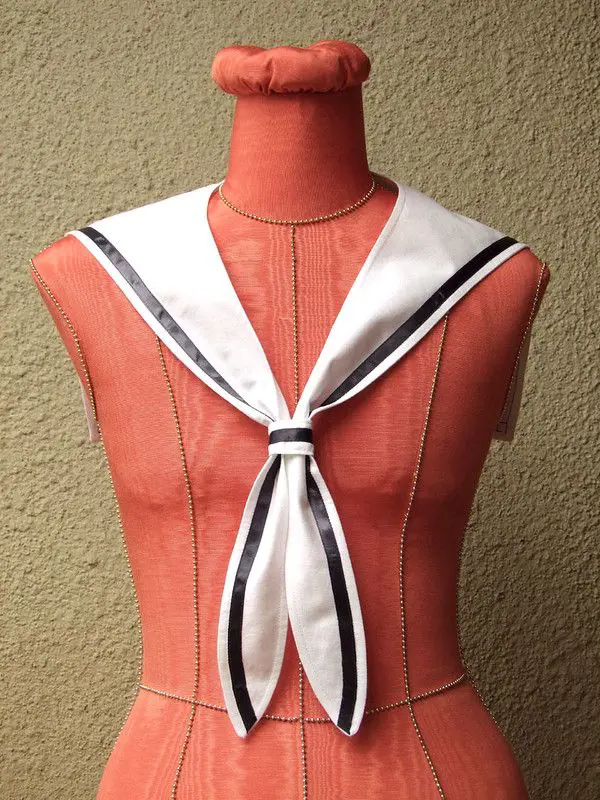
Firstly, let's start with the collar. The sailor collar is a defining feature of a sailor dress and adds a nautical touch to the overall design. To create an authentic collar, begin by selecting a fabric that matches the color and texture of your dress. Traditionally, a white or navy blue fabric is used, but you can also experiment with other colors to suit your personal style. Once you have chosen the fabric, cut out a rectangular shape that is twice the desired width of your collar.
Next, fold the rectangle in half lengthwise, with the right sides facing each other. Sew along the long edge, leaving the shorter ends open. This will create a tube-like structure. Turn the tube right side out and press it flat with an iron. You should now have a long, rectangular strip of fabric.
To attach the collar to the neckline of your dress, fold the collar strip in half widthwise, with the wrong sides facing each other. Align the raw edges of the collar with the raw edge of your dress's neckline and pin them together. The folded edge of the collar should be facing towards the body of the dress. Sew the collar along the neckline, using a sewing machine or hand stitching, making sure to backstitch at the beginning and end to secure the collar in place.
Now, let's move on to the sailor-style collar flaps. These add a classic touch and mimic the look of sailor uniforms. To create the collar flaps, start by cutting two rectangular pieces of fabric. The dimensions of these rectangles can vary depending on the size and style of your dress. A common size is around 4 inches wide and 8 inches long, but you can adjust this according to your preference.
Fold each rectangle in half lengthwise, with the right sides facing each other. Sew along the long edge, leaving the shorter ends open. Turn the rectangles right side out and press them flat with an iron. You should now have two long, rectangular flaps.
To attach the flaps to your dress, pin them to the front of the dress, just above the collar and centered. The open ends of the flaps should align with the outer edges of the collar. Sew the flaps in place, stitching close to the edges, to secure them to the dress.
To give the flaps a finished look, you can add decorative elements such as buttons or bows to the outer edges. This will add an extra touch of authenticity and style to your sailor dress.
In conclusion, adding authentic sailor dress details like a collar and sailor-style collar flaps can elevate the overall look of your garment. By following these steps and using the right materials, you can create a sailor dress that is both charming and true to the classic design. Whether you're making a costume or a fashion statement, these details will surely make your dress stand out. So go ahead and give your dress a nautical flair with these tips and tricks!
Revamp Your Style: Master the Art of Recoloring Dress Shoes
You may want to see also
![]()
How can I customize and personalize my sailor dress to make it unique?
Sailor dresses have been a classic fashion staple for many years. These dresses are known for their nautical-inspired design, with a collar, button detailing, and a flared skirt. While classic sailor dresses are beautiful on their own, you may want to add your personal touch to make it even more unique to you. Here are some steps and ideas to help you customize and personalize your sailor dress:
- Choose the right fabric: The first step in customizing your sailor dress is to select the fabric. Choose a fabric that suits your style and complements your skin tone. You can go for a classic solid color or experiment with patterns and prints to make your dress pop.
- Add embellishments: One way to personalize your sailor dress is by adding embellishments. You can sew on buttons of different colors, shapes, or designs to the collar or pockets of your dress. Alternatively, you can use fabric paint or fabric markers to draw patterns or designs on your dress.
- Modify the collar: The sailor dress is known for its distinctive collar. You can make your dress unique by modifying the collar. You can add lace trim, embroidery, or even detachable bows to the collar to give it a one-of-a-kind look.
- Belt it up: Another way to personalize your sailor dress is by adding a belt. A belt can accentuate your waistline and add a touch of femininity to the dress. You can choose a belt in a contrasting color or a statement piece with a unique buckle to make your dress stand out.
- Experiment with accessories: Along with customizing the dress itself, you can also personalize your sailor dress by pairing it with unique accessories. Try wearing a hat or a headband with a nautical theme, or add a statement necklace or bold earrings to complete your look.
- Tailor the fit: One of the easiest ways to make your sailor dress unique is by tailoring it to fit you perfectly. Getting the dress tailored to your exact measurements will ensure that it flatters your body shape and enhances your figure. A well-fitting dress will make you feel more confident and comfortable.
- Mix and match: Lastly, don't be afraid to mix and match different elements to create a truly unique sailor dress. You can combine different fabric patterns, experiment with different collar styles, or even layer your dress with a cardigan or jacket to create a personalized look.
In conclusion, customizing and personalizing your sailor dress can be a fun and creative process. By choosing the right fabric, adding embellishments, modifying the collar, belting it up, experimenting with accessories, tailoring the fit, and mixing and matching different elements, you can create a sailor dress that is truly unique to you. Have fun with the process and let your creativity shine!
Understanding the Length of a Toddler Size 3 Sun Dress
You may want to see also
Frequently asked questions
Yes, you can definitely make your own sailor dress as a beginner. There are many beginner-friendly patterns and tutorials available online that provide step-by-step instructions and guidance. With practice and patience, you can create a beautiful sailor dress.
The best fabric for a sailor dress is usually a medium-weight cotton. Cotton fabrics are comfortable to wear, easy to work with, and have a good drape. Look for fabrics with a slight stretch to ensure a comfortable fit.
When choosing a pattern for a sailor dress, look for one that includes the classic sailor collar and button details. Pay attention to the recommended skill level and size range of the pattern to ensure it fits your needs. It's also helpful to read reviews or look for pattern hacks online to see how others have customized the design.
To make a sailor dress, you will need fabric, matching thread, sewing needles, a sewing machine, scissors, pins, buttons, interfacing (to stiffen the collar), and a measuring tape. Optional supplies include a marking tool and a seam ripper.
While having some basic sewing skills is helpful, you can learn as you go when making a sailor dress. Follow the pattern instructions carefully, take your time, and don't be afraid to ask for help or consult online tutorials if needed. Practice and patience will go a long way in creating a beautiful sailor dress.